Let’s Unit Test RPi Pico with PlatformIO!
Toon Robotics is supported by its audience. When you purchase through links on my site, I may earn an affiliate commision.
PlatformIO and Unit Testing
In this article, I will consider the settings for unit testing Raspberry Pi Pico with PlatformIO. In particular, there are some special settings required when using Raspberry Pi Pico, so let’s take a look at those settings as well. The same procedure can be used for unit tests on other boards such as Arduino.
Overall Policy
Our policy is to test frequently used functions in the native (local) environment. And if you need to test on a device, test it using the actual device.
Therefore, set up your environment so that you can test in the native environment and on the actual device in parallel. In other words, you should be able to switch between the native and Raspberry Pi Pico environments.
View Raspberry Pi Pico on AliExpress, eBay
Next, as for unit testing frameworks, Unity is one of the most commonly used unit testing frameworks in PlatformIO. GoogleTest and others are also available, but we will use Unity because of the large number of boards it supports. There is a game engine of the same name, but it has nothing to do with what we will use here.
There are also some issues that arise when unit testing with Unity on the Raspberry Pi Pico. How to deal with these will also be described.
Preparation: Installation of MSYS2 (for Windows)
In order to use the native environment, an environment where GCC can be used is required as a preliminary step. For Windows, please install MSYS2.
After the installation of MSYS2, execute the following commands to set up the GCC environment.
pacman -S mingw-w64-ucrt-x86_64-gccAnd the following directory must be added to the PATH environment variable.
C:\msys64\mingw64\binC:\msys64\ucrt64\bin
C:\msys64\usr64\bin
For more information and to configure the environment under Linux and macOS, click here.
Edit platformio.ini
Now we will write a configuration file so that we can switch between the environment for Raspberry Pi Pico and the native (local) environment.
Edit platformio.ini, which is generated when creating a PlatformIO project, as follows.
[env:native]
platform = native
test_framework = unity
test_ignore = test_embedded_pico

[env:pico]
platform = raspberrypi
board = pico
framework = arduino
test_ignore = test_native
test_framework = custom
env:pico is the environment for Raspberry Pi Pico and env:native is the native environment. The point is that env:native and env:pico ignore unrelated directories in test_ignore.
In env:native, test_framework=unity is used, but in env:pico, test_framework=custom is used for some reason. The reason for this is explained later.
Files and Directory Structure
Prepare the necessary source files.
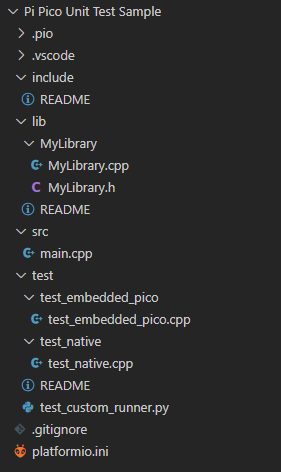
Directory “lib”
This time, we will prepare classes to be used as our own library as MyLibrary(.h, .cpp). These files should be placed in “lib/MyLibrary“.
MyLibrary.h and MyLibrary.cpp are as follows.
#ifndef MyLibrary_h
#define MyLibrary_h

class MyLibrary{
public:
    static int testFunction();
};

#endif
#include "MyLibrary.h"
int MyLibrary::testFunction(){
return 5;
}This class is simple, with only one function, testFunction(), for testing.
testFunction just returns an integer value of “5″.
Directory “src”
When you create a project, PlatformIO generates main.cpp in the directory “src“. We will not use this file this time, but we will leave the auto-generated file as it is because we expect to write programs in this directory in ordinary development.
Directory “test”
The test codes for unit tests should be placed under the directory “test“.
Under this directory, we will prepare a directory “test_native” for the native test code and a directory “test_embedded_pico” for the pico test code. Prepare your code there.
The test code for the native environment is test_native.cpp and the test code for the pico environment is test_embedded_pico.cpp.
Roles of directories “src” and “lib”
PlatformIO does not build source code in the directory “src” during test execution unless it is specially configured. Source codes used for both the actual program and test code should be placed under the directory “lib“.
(Although not used in this article, test_build_src is available as an option to build code under the directory “src” at test time.)
Other necessary files
In addition, a file named test_custom_runner.py is required directly under the directory “test” for the pico test environment.
The directory structure is shown in Figure 1.
Implement a custom testing framework
Now let’s see what the last source code “test_custom_runner.py” looks like. This corresponds to “test_framework=custom” set in environment env:pico and runs the user-defined test environment.
Why do we need to prepare something like this to run our custom tests? This is to avoid problems that occur when testing Unity on the Raspberry Pi Pico.
When developing the Raspberry Pi Pico with PlatformIO, the “framework=arduino” is set in the platformio.ini file, and the Arduino Mbed OS RP2040 Boards is used as firmware. (This is not the case if you are using the earlephilhower version.)
In fact, the firmware itself contains Unity, so if we try to link the Unity library again, it will be multiplexed and an error will occur. (Reference)
Therefore, if we set “test_framework=unity” in this situation, we will get the following error message at build time.
collect2: error: ld returned 1 exit statusIt then terminates with an error.
These problems are also likely to be the same for Arduino boards that use mbed core, such as Arduino Nano 33 BLE.
So we need to prepare a custom test to avoid these problems. However, its implementation is simple, so let’s prepare it.
Implement test_custom_runner.py as follows.
from platformio.public import UnityTestRunner

class CustomTestRunner(UnityTestRunner):

    EXTRA_LIB_DEPS = None

    def configure_build_env(self, env):
        pass
This code is based on information here. Also, more information about custom testing can be found here.
If you have prepared everything up to this point, you are ready to go. Now let’s actually implement the test code.
Create test code
Create test_native.cpp and test_embedded_pico.cpp as follows.
test_native.cpp
#include <unity.h>
#include "MyLibrary.h"

void setUp(void){

}

void tearDown(void){

}

void testMyLibrary(){

    TEST_ASSERT_EQUAL_INT(5, MyLibrary::testFunction());

}

int runUnityTests(void){
    UNITY_BEGIN();
    RUN_TEST(testMyLibrary);
    return UNITY_END();
}

int main(void){
    return runUnityTests();
}
test_embedded_pico.cpp
#include <Arduino.h>
#include <unity.h>

#include "MyLibrary.h"

REDIRECT_STDOUT_TO(Serial);

void setUp(void){

}

void tearDown(void){

}

void testMyLibrary(){

    TEST_ASSERT_EQUAL_INT(5, MyLibrary::testFunction());

}

int runUnityTests(void){
    UNITY_BEGIN();
    RUN_TEST(testMyLibrary);
    return UNITY_END();
}


void setup(){
    while(!Serial){}
    runUnityTests();
}

void loop(){

}
In this test, the test function testMyLibrary() is executed and tested.
TEST_ASSERT_EQUAL_INT confirms that the value returned by testFunction() of MyLibrary is the integer value “5“.
The implemented testFunction() is implemented as a method that only returns an integer 5, so this test should pass without problems.
Also, as part of the Unity specification, setUp() and tearDown() must be implemented.
setUp() is a function that is executed before the test, and tearDown() is a function that is executed after the test.
This setUp() is different from the setup() in test_embedded_pico.cpp. (It is setUp() and setup(), so they are programmatically distinct.)
Implementation of test_native.cpp
First, let’s look at test_native.cpp. This is a general C/C++ program for local execution, so the function int main() is required. When executed, execution starts from this function.
Implementation of test_embedded_pico.cpp
On the other hand, test_embedded_pico.cpp does not need a main() function, but instead requires a setup() and loop() function like a normal Arduino sketch.
Here is another point for use with the Raspberry Pi Pico.
REDIRECT_STDOUT_TO(Serial);If this line is not added, the test results will not be displayed correctly. Also, in setup(), the following line is added to wait until serial communication is ready.
while(!Serial){}For a detailed reference on how to use Unity, including other test functions, click here.
Run a Test
Now let’s run the test.
We will start with test_native. If the development environment is not env:native, switch as shown in Figure 2.
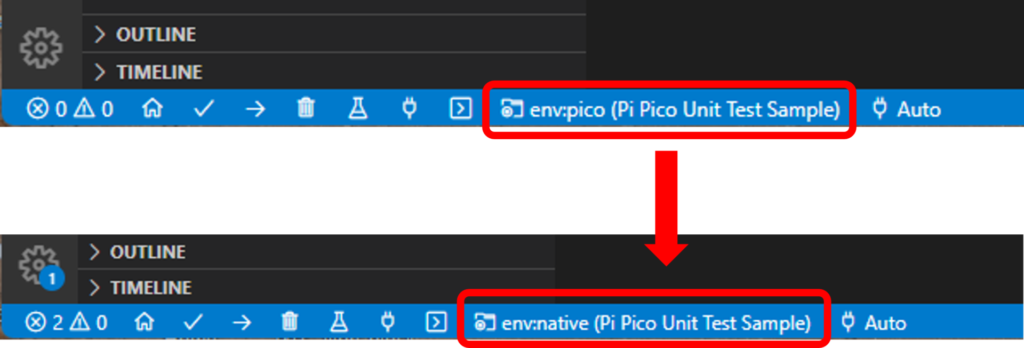
Once the environment is env:native, press the “Test” button. (Figure 3)

Once executed, it should appear as shown in Figure 4.
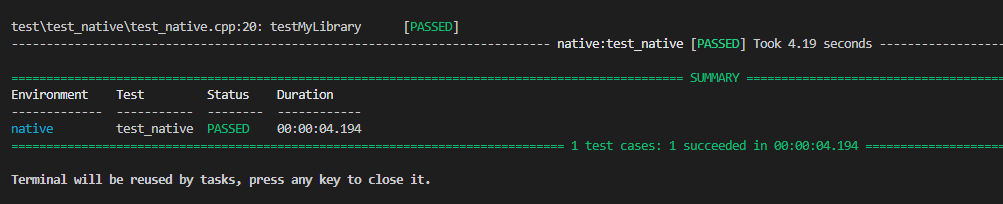
The test_native is now “PASSED” and the test has succeeded.
Next time you run test_embedded_pico, switch the environment to env:pico and connect the Raspberry Pi Pico. In that situation, press the test button as well, and you should see something like Figure 5.
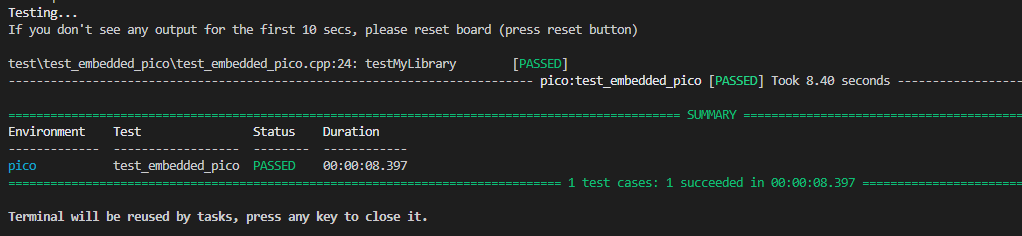
This also succeeds with test_embedded_pico being “PASSED“.
When you can’t get it to work
In some cases, the Unity libraries may already be installed due to a misconfiguration. In this case, deleting “.pio/libdeps” and rebuilding it may work. (Reference)
Sample project available on Github!
The sample we used this time is available on Github, so please take a look at it as well.
The basic flow is the same when using other boards such as Arduino. However, depending on the board, it may be necessary to make special settings as in the case of the Raspberry Pi Pico.
View Arduino on eBay
For the latest status, check here.